How to Set Up IPTV on Kodi: Complete Australian Guide
Learning how to set up IPTV on Kodi opens up a world of streaming possibilities for Australian viewers. Moreover, Kodi has become one of the most popular media centre platforms, offering flexibility and customisation that traditional streaming apps simply cannot match. Therefore, understanding the setup process helps you maximise your entertainment options whilst staying in control of your viewing experience.
What Is Setting Up IPTV on Kodi?
Setting up IPTV on Kodi involves configuring the media centre software to receive and display internet-based television streams. Essentially, Kodi acts as a unified platform where you can access various IPTV services through specialised addons or built-in features. Furthermore, this setup allows you to organise all your streaming content in one convenient location.
Kodi is open-source software that runs on multiple devices, including computers, Android boxes, Fire TV sticks, and even smartphones. Additionally, its modular architecture means you can install specific addons designed for IPTV playback. These addons connect to IPTV providers and enable seamless streaming through Kodi’s user-friendly interface.
For Australian users, this setup provides access to both local and international content. However, the quality and reliability of your experience depend heavily on choosing reputable IPTV providers and configuring Kodi correctly.
How IPTV Setup on Kodi Works
The process works through a combination of Kodi’s core functionality and third-party addons. Initially, you need to install Kodi on your preferred device. Then, you enable the installation of addons from external sources, which gives you access to IPTV-specific tools.
Most IPTV services provide M3U playlist files or Xtream Codes API credentials. These contain the necessary information for Kodi to connect to streaming servers. Consequently, when you input these details into Kodi’s PVR (Personal Video Recorder) client or a dedicated addon, the software can fetch and display available channels.
The PVR IPTV Simple Client is Kodi’s built-in solution for basic IPTV functionality. Meanwhile, more advanced users often prefer third-party addons that offer additional features like electronic programme guides, catch-up TV, and recording capabilities. Your chosen method depends on your technical comfort level and specific requirements.
How to Use IPTV Setup on Kodi in Australia
Australian users have several options when configuring IPTV on Kodi. First, ensure you have a stable internet connection with adequate speed for streaming. A minimum of 10 Mbps is recommended for standard definition content, whilst high-definition streams require at least 25 Mbps.
Next, download and install Kodi from the official website at kodi.tv. The software is completely free and available for Windows, Mac, Linux, Android, and iOS devices. Moreover, many Android streaming boxes come with Kodi pre-installed, though you should always verify you have the latest version.
Once Kodi is installed, you’ll need legitimate IPTV service credentials. Research providers that operate legally in Australia and offer the channels you want to watch. Additionally, check customer reviews and ensure they provide reliable technical support for Australian customers.
Beginner-Friendly Step-by-Step Guide
Follow these detailed steps to successfully set up IPTV on Kodi in Australia:
Step 1: Open Kodi and navigate to the Settings menu by clicking the gear icon on the home screen. Then, select “System” followed by “Add-ons.”
Step 2: Enable “Unknown sources” by toggling the switch. This allows you to install third-party addons. However, only install addons from trusted sources to maintain security.
Step 3: Return to the Kodi home screen and click “Add-ons” in the left menu. Then, select the open box icon at the top to access the addon browser.
Step 4: Choose “Install from repository” and navigate to “PVR clients.” Locate “PVR IPTV Simple Client” and click install. Furthermore, wait for the installation confirmation notification.
Step 5: After installation, click “Configure” to access the addon settings. Select “General” and choose your preferred input method (M3U playlist URL or local file path).
Step 6: Enter your IPTV provider’s M3U URL in the location field. Alternatively, if you have Xtream Codes credentials, select that option and input your username, password, and server URL.
Step 7: Navigate to the EPG settings tab and configure your electronic programme guide source if your provider offers one. This enhances your viewing experience with channel schedules.
Step 8: Click “OK” to save your settings. Then, restart Kodi to ensure all changes take effect properly.
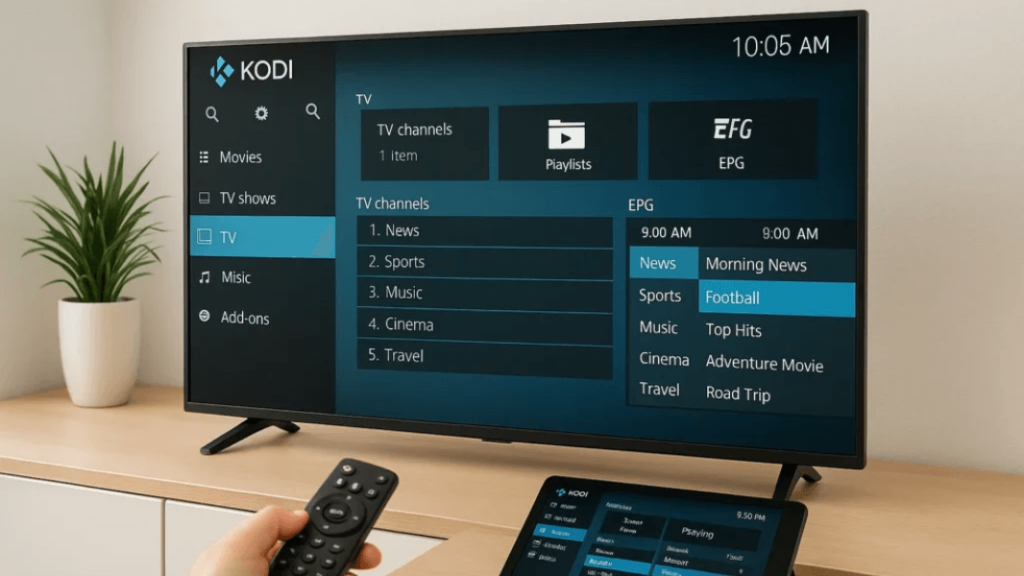
Step 9: Return to the Kodi home screen and select “TV” from the main menu. Your IPTV channels should now appear in the channel list.
Step 10: Test several channels to verify everything works correctly. Adjust buffer settings if you experience playback issues.
Helpful Tips to Improve Your Experience
Optimising your Kodi IPTV setup ensures smooth and reliable streaming. First, regularly update both Kodi and your installed addons to benefit from bug fixes and performance improvements. Developers frequently release updates that enhance stability and security.
Consider using a wired Ethernet connection instead of Wi-Fi whenever possible. This provides more consistent bandwidth and reduces buffering interruptions. Moreover, if you must use wireless connectivity, ensure your device is close to your router or use a Wi-Fi extender.
Customise Kodi’s cache settings to improve buffering performance. Navigate to theadvancedsettings.xml file and adjust the buffer size according to your device’s available memory. However, be cautious with these modifications, as incorrect settings can cause instability.
Organise your channels into favourites groups for easier navigation. Kodi allows you to create custom channel lists, making it simpler to access your most-watched content. Additionally, explore different Kodi skins that might offer better visual layouts for IPTV viewing.
Always maintain your IPTV subscription and ensure your provider’s services remain active. Furthermore, keep backup M3U URLs or credentials in case you need to reconfigure your setup. Regular maintenance prevents unexpected service interruptions.
Finally, familiarise yourself with Kodi’s keyboard shortcuts and remote control functions. These time-saving features make channel switching and playback control much more convenient during daily use.
Conclusion
With the right approach, you can easily get started with how to set up IPTV on Kodi in Australia and enjoy comprehensive streaming capabilities. The initial configuration might seem complex, but following these steps systematically ensures success. Remember to choose legitimate IPTV providers, maintain your system updates, and optimise your network connection for the best possible viewing experience. Take your time during setup, and don’t hesitate to consult Kodi’s extensive documentation or community forums if you encounter any difficulties along the way.